Turn on or off the establishing shot
Click the camera icon next to a Scene to choose either Establishing shot or Skipping establishing shot. This feature turns on or off the brief wide angle shot of a scene before the dialogue commences.
By skipping the establishing shot, you can cut seamlessly from one scene to the next. You also can use this feature as an editing tool to add more characters in a scene.
Advanced camera controls
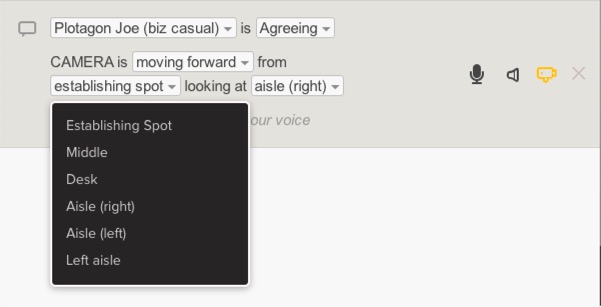
Plotagon has a built-in automatic editor called “dialogue mode” in which the camera looks over the non-speaking character’s shoulder at the speaking character. (It’s the traditional Hollywood shot-reverse-shot technique.) However, certain scenes allow you to override this default setting and manage how the camera records the scene.
1. Click the camera icon.
2. Choose how you want the camera to behave:
Camera is | |
| in dialogue mode | This is the standard, automatic camera that looks over the non-speaking character’s shoulder at the speaking character. This is the default. |
| moving right | The camera moves to the right. |
| moving left | The camera moves to the left. |
| moving forward | The camera moves forward (dolly, not zoom). |
| moving backward | The camera moves backward (dolly, not zoom). |
| wide shot | The camera shows both characters and does not move. |
| Still | The camera does not move, regardless of where the characters are positioned or which character is speaking. |
3. Select the camera location. This will be similar to the list of character locations and will vary by scene.
4. Select where you want the camera to point.


The camera icon will turn yellow, indicating that you have overridden the default controls. If you wish to return to the default “dialogue mode” setting, then simply click the camera icon again.
